Change what your receipts and tickets print
Set the header and footer text, choose what each printed document shows in the receipt editor, and print a receipt again.
On this page
Everything Verimly prints, from the guest's receipt to the kitchen ticket and the end-of-day report, follows a layout you can change. Most businesses only add a header and footer line; the editor lets you go further when you need to.
Before you start
- You need the Receipt layout permission to change receipts. Without it you can view the layout but not save.
- Business details such as your legal name, VAT number and company registration number come from Settings › General. Fill them in there first.
- Printing needs an ESC/POS receipt or station printer. See Set up a printer.
See your current receipt
Go to Settings › Receipts. The page shows a preview of the Receipt and a summary:
- Header text and Footer text.
- Business details printed on it.
- QR code: on or off.
- Language: receipts print in your business language.
- Other documents: how many have a customised layout.
Service charge and order numbering are not set here; they are under Settings › Orders & receipts.
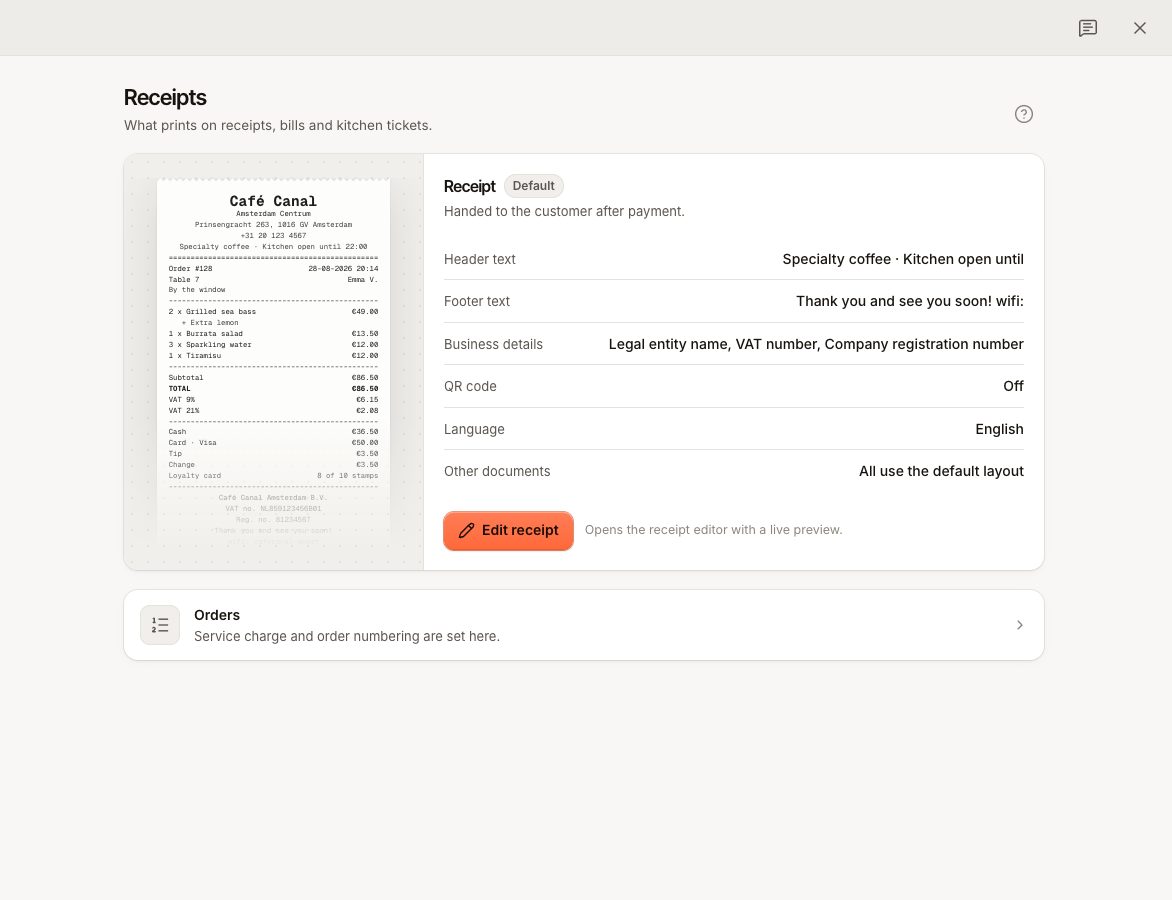
Change the header and footer
- On Settings › Receipts, select Edit receipt. The editor opens with a live preview.
- Open the Header section and enter the Header text, for example your opening hours. It prints at the top.
- Open the Footer section and enter the Footer text, for example a thank-you note. It prints at the bottom.
- Select Save.
The header and footer texts are shared by your documents: resetting a layout keeps them.
Edit a document's layout
In the editor, choose the Document to edit:
| Document | When it prints |
|---|---|
| Receipt | Handed to the customer after payment. |
| Bill | The itemised bill brought to the table before payment. |
| Kitchen ticket | Sent to the prep station. No prices, large item names. |
| Void / comp ticket | Tells the kitchen about a correction. |
| X report | Mid-shift till report. |
| End-of-day (Z) report | Printed when the till is closed. |
| Gift card balance slip | After a gift card paid part of a bill. |
| Online order ticket | At the counter for a pickup order. |
Click a part of the preview to edit it, or open the sections: Header, Order details, Lines & totals, Payments, Business details, Footer and Paper & language. All blocks lists every line of the paper; you can reorder, hide or add your own with Add block.
Useful settings on the item list include Print quantity, Print price (usually off on kitchen tickets), Print modifiers, Print item notes, Print item checkboxes and Group by course.
You can also add:
- A QR code with a Link, for example to a review page, your menu or website, and a caption below it.
- A Barcode (CODE128) of a field, for scanning at the till.
- Text lines with fields filled in at print time, such as the order number or table. Use Insert field… to add one.
Select Save when you are done. To start again, use Reset to default: the document goes back to the default layout and your header and footer texts stay.
About the preview
The preview uses sample data. Paper width only changes the preview; each printer prints on its own paper width. Lines without a value, such as a VAT number you have not filled in, are skipped on paper.
Print a receipt again
On the POS, open Orders, find the closed order and tap Print receipt. Reprinting needs the Reprint permission; without it, a manager can approve with their PIN.
Right after a payment, Print receipt is also on the payment screen. To print a receipt after every payment automatically, turn on Print a receipt after payment for the receipt printer on the POS.
Email receipts
The POS does not email receipts. Guests who pay through the QR code can enter an Email for your receipt when they pay.
Common questions
Can I add my logo?
No. Receipts are printed as text. Print the business name larger with Name size in the Header section, or add a QR code to your website.
Can receipts print in another language?
Receipts print in your business language. Change it under Settings › General.