Set up your floor plan
Draw your rooms and tables in the back office so staff can open orders per table on the POS, and keep the plan up to date when the layout changes.
On this page
The floor plan is a drawing of your venue: areas such as the dining room or terrace, the tables in them with their seats, and decor like walls and the bar counter. The POS shows the same plan, so servers tap a table to open its order and see at a glance which tables are taken.
Before you start
- Turn on the Floor plan & tables feature for the location under Settings › Features. It is included in every plan. Without it, the POS takes orders by name only.
- Editing the plan needs the Manage locations permission. Staff who can view locations can look at it.
- The plan belongs to one location. Pick the location at the top of the back office first.
Open the editor
- In the back office, go to Settings › Tables & floor plan.
- Click the Floor plan card. The editor opens on the first area.
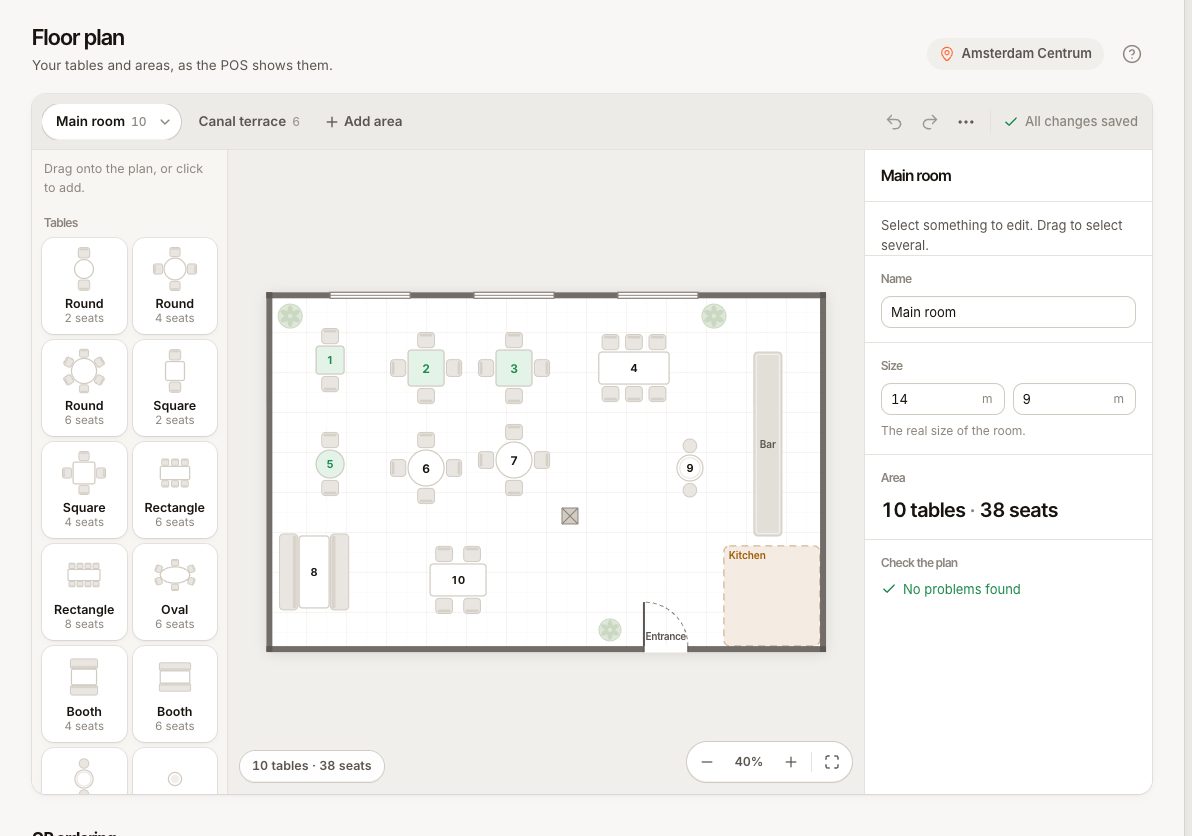
Add areas
An area is a room or zone, for example Main room, Terrace or Bar. On the POS, each area is a section you can switch between.
- Click Add area (or Add the first area on an empty plan).
- Enter a Name, and the real Width and Depth of the room in metres.
- Use the area's options to rename and resize it, move it left or right in the list, or Delete area.
Deleting an area removes its decor and tables when you save. Tables with order history are archived rather than deleted, so their history is kept.
Add tables
You can place tables one by one or generate a grid.
One by one
- In Add to the plan, pick a table shape under Tables: Round, Square, Rectangle, Oval, Booth, High-top or Bar stool.
- Drag it onto the plan, or click it to add it.
- Drag the table to its place. Click it to edit its details.
As a grid
- Click Quick start (or Generate tables on an empty area).
- Choose how many Tables, Seats each, the Shape, an optional Prefix (T gives T1, T2…) and the First number.
- Tick Draw walls around the room if you want walls drawn.
- Click Add {count} tables.
Set a table's details
Click a table to open its details:
| Field | What it does |
|---|---|
| Number | The name shown on the POS, kitchen tickets and receipts. Must be unique at the location. |
| Seats (Up to) | How many guests fit. The POS shows this when you move an order. |
| At least | For online booking: the smallest party this table is given to. |
| Shape, Size, Rotation | How the table is drawn. |
| Area | The room it belongs to. |
| In use | Switch off to hide the table on the POS without deleting it. |
| Reservable online | Whether online booking can give guests this table. |
| Can be joined with | Notes which tables you push together for bigger groups. It does not merge orders on the POS. |
| QR code | The table's ordering link, if QR ordering is on. Save the plan first to get one. |
Select several items by dragging around them, then use Align and Distribute to line them up.
Add decor
Under Room, add a Wall, Bar counter, Window, Door, Plant, Pillar, Label or Zone. Decor helps staff recognise the room; it has no effect on orders.
Save the plan
- Check the problems list. Problems shown in red must be fixed before saving, for example "Two tables are called {name}", "A table has no number", or tables that overlap or stick out of the room.
- Click Save plan. You see "Floor plan saved".
The POS picks up the new plan straight away. If someone else saved the plan while you were editing, choose Load their version or Save mine anyway.
How it shows up on the POS
- The Floor tab shows each area. Switch between Plan (the drawing) and Tiles (a grid of buttons).
- Free tables show Free. Taken tables show their total, how long they have been open and how many items are not sent.
- Tap a free table to open it. Tap a taken table to open its order.
Common questions
Can I change the plan during service?
Yes. Tables with an open order show "Open order #…" in the editor and can still be moved. You cannot remove a table that still has an open order ("Table {name} still has open order #… Close it before removing the table.").
Can I merge tables on the POS?
No. There is no table or order merge on the POS. To seat a group across two tables, run one order on one of them. See Move an order to another table.
Do I need a floor plan for reservations?
Reservations assign tables, so tables need seats set. Use Reservable online and At least to control which tables online booking can offer. See Set up reservations.
If something goes wrong
| Message | What to do |
|---|---|
| A table named {name} already exists. | Give each table a unique number |
| The floor plan could not be saved: something in it is not valid. | Reload the editor and try again |
| Someone else saved this floor plan in the meantime. | Load their version, or save yours over it |
| No tables at this location (on the POS) | Check you are editing the right location, and save the plan |